

This updated tutorial uses the template used for designing traditional app inventor tutorials. The old tutorial has been replaced as this new one is much more informative and understandable.
Catch!
This game has been won the app of the month[youth] August 2015.
The Catch! tutorial demonstrates how to make a simple game using the canvas and ball components.It also shows how the timer component is used. However this tutorial does not teach you how to add media and difficulty settings. These are only present in the app in the gallery. There is another tutorial on my website
This tutorial assumes you are familiar with the basics of App Inventor– using the Component Designer to build a user interface, and using the Blocks Editor to specify the app’s behavior. If you are not familiar with the basics, try stepping through some of the basic tutorials before continuing.
Getting Started
Connect to the App Inventor web site and start a new project. Name the new project “Catch!” (without the double quotes) and set the screen’s Orientation to Sensor.
Introduction
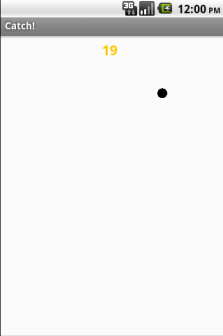
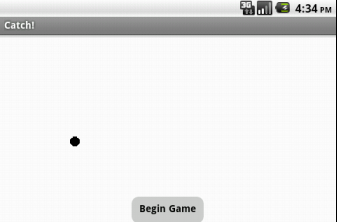
The finished Catch app will display a screen with a ball and a Begin Game button. On clicking the button, the ball starts moving and a timer appears. To win the game you will have to catch the ball within the given time.
- Variables
- Procedures
- Button.Click blocks
- Logic (if-else) blocks
This tutorial introduces the following:
- Using a Canvas
- Using the ball sprite
- Using a timer
- Using multiple screens
- Passing information through multiple screens
Main Screen
Set up the Components
Use the component designer to create the interface for Catch!. When completed, the designer should look similar to the snapshot below.
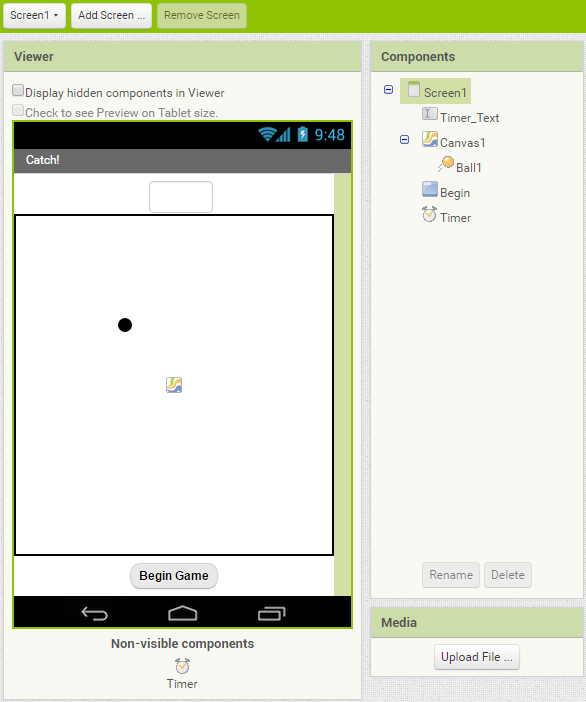
The Components of this screen are:
| Component Type | Palette Group | What you’ll name it | Purpose of Component |
| TextBox | User Interface | Timer_Text | Shows How much Time is remaining |
| Canvas | Drawing and Animation | Canvas1 | Holds the ball. A canvas is necessary for drawing and animation of any sprite [object] |
| Ball | Drawing and Animation | Ball1 | Moves around the Screen |
| Button | User Interface | Begin | Starts the game when clicked |
| Clock | Sensors | Timer | Counts Time passed since beginning of game |
Set the properties as described below:
| Component | Action |
| Timer_Text | Set Width to 50px, TextColor to Orange, FontSize to 20px, and FontBold to True. also Set Hint to [blank]. |
| Canvas1 | Set Width to Fill parent… and Height to Fill parent. |
| Ball1 | Set Radius to 7,x to 100 and y to 100 |
| Begin | Set FontBold to True, FontSize to 14,Text to “Begin Game”, TextAlignment to center, and Shape to rounded |
| Timer | Set TimerEnabled to False,TimerInterval to 1000, an TimerAlwaysFires to true. |
Add Behaviors to the Components
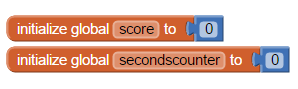
The interface is complete, but the button doesn’t make the ball move. Open the Blocks Editor to add the behavior to the button. First, you’ll define variables to take care of the timer and the score
| Block Type | Drawer | Purpose |
| def variable | Variables | Defines the timer variable[secondscounter] |
| def variable | Variables | Defines the score variable[score] |
The variables should like this:
Create the ‘Begin’ button Blocks
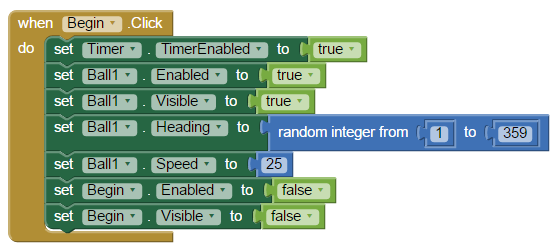
The blocks you will create respond to clicks on the ‘Begin’ buttons. To build the block, you will need the following blocks:
| Block Type | Drawer | Purpose |
| Begin.Click | Begin | Defines the block for responding to click on ‘Begin’ |
| set Timer.TimerEnabled | Timer | Starts the timer |
| set Ball1.Enabled | Ball1 | Enables the ball[for clicking] |
| set Ball1.Visible | Ball1 | Starts the timer |
| set Ball1.Heading | Ball1 | Sets the ball’s direction |
| set Ball1.Speed | Ball1 | Sets the ball’s speed |
| set Begin.Enabled | Begin | Disables the button |
| set Begin.Visible | Begin | Removes the button from the screen |
| true(x3) | Logic | Sets value to true |
| false(x2) | Logic | Sets value to false |
| random integer | Math | sets value to a random integer between 1 and 359 |
| 0 | Math | sets value to a number |
The blocks should look like the following:
Most blocks in App Inventor require you to know exactly what component your app will manipulate when you design the app. For some apps, you will have several of the same type of component and you want to program the same behavior for all of the similar components. The blocks in the Advanced section allow you to build some general manipulation on some type of component.
How the Blocks Work
Setting the Width and Height property for a Canvas works exactly the same way as setting the Width and Height of a Button. For whatever positive number is set, the Canvas will resize its appearance to fit that value. There are two values that are exceptions to the using positive values rule: -1 and -2. Setting Canvas.Width or Canvas.Height to -1 is like setting the Width or Height to Fill parent in the designer. Setting Canvas.Width or Canvas.Height to -2 is like setting the Width or Height to Automatic in the designer.
Warning: You can set the Canvas Width and Height to any positive number you want. The Canvas will change its size to match the values you set; but on some devices, the Canvas does not change its size correctly. The behavior on such devices is usually unpredictable.
Create the blocks for what happens when the ball is touched
You will now add the blocks for deciding what happens when the ball is touched
| Block Type | Drawer | Purpose |
| Ball1.Touched | Ball1 | Responds to touching of Ball1 |
| set Begin.Enabled | Begin | Enables the button(for later) |
| set Begin.Visible | Begin | Makes the invisible button visible |
| set Ball1.Enabled | Ball1 | Disables the ball |
| set Ball1.Speed | Ball1 | Stops the ball |
| open another screen with start value | Control | Opens the Restart Screen |
| true (x2) | Logic | Sets value to true |
| false (x2) | Logic | Sets value to false |
| 0 | Math | Sets value to a number |
| “” | Text | Sets value to a string [text] |
| get [global score] | Variables | Sets the value of the global variable ‘score’ |
The blocks should look like the following:
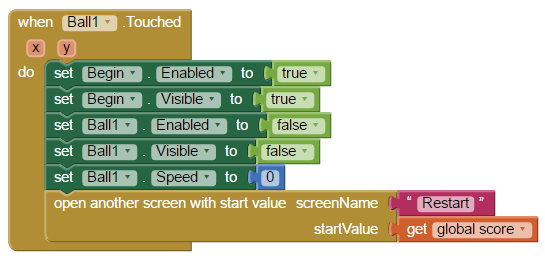
How the Blocks Work
The Begin.Visible block takes a true/false value (also called a boolean) to tell it whether to show the button or not. Setting a Begin.Visible block to true causes the button to be visible.The open another screen with start value block open another screen whose name is given as screenName. It also passes information through a startValue which can be used in the other screen.
Create the blocks for the timer
You will now add the blocks for making a timer
| Block Type | Drawer | Purpose |
| Timer.Timer | Timer | Executes statements on every tick of the timer [here 1 second] |
| set/get [global secondscounter](x3) | Variable | Sets the value of the secondscounter variable |
| set/get [global score](x3) | Variables | Sets the value of the global score variable. |
| set Timer_Text.Text | Timer_Text | Shows the time remaining |
| if | Control | Checks if time is over |
| open another screen with start value | Control | Opens the Restart Screen |
| 0(x4) | Math | Sets value to a number |
| “” | Text | Sets value to a string [text] |
| = | Math | Checks if two Values are Equal |
| + | Math | Adds two ore more values |
The blocks should look like the following:
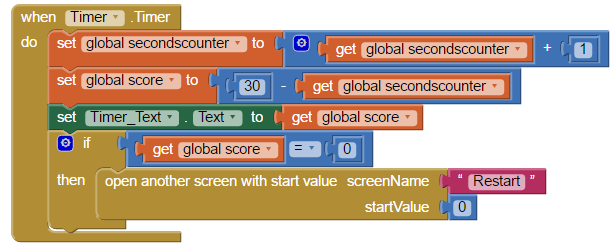
How the Blocks Work
The Timer.Timer block executes commands after every interval. The interval in our case is set to 1000(ms). Changing the Timer_Text.Text block’s value changes the text shown in the textbox.The if block makes a decision depending on whether the attached block is true or false. open another screen with start value has been discussed about earlier.
Making the ball bounce
As you may have realized, the ball does not bounce of the edge of the canvas. To make it do so, you will now add the following blocks
| Block Type | Drawer | Purpose |
| Ball1.EdgeReached | Ball1 | Executes commands when ball touches the edge of its canvas. |
| Ball1.Bounce | Ball1 | Makes the ball bounce off an edge |
| get[edge] | variables | finds the edge the ball has hit |
The blocks should look like the following:
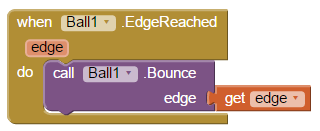
How the Blocks Work
The Ball.EdgeReached block executes commands when the ball reaches an edge of the canvas.TheBall1.Bounce block makes the ball bounce off a given edge.
Restart Screen
Set up the Components
Use the component designer to create the interface for the Restart Screen. When completed, the designer should look similar to the snapshot below.
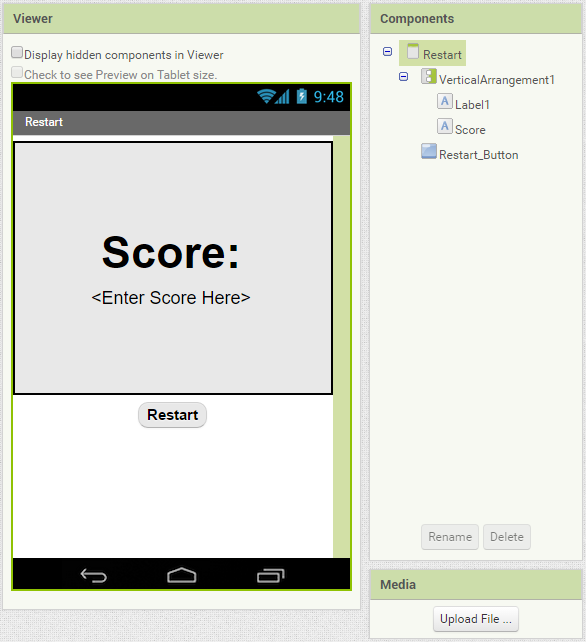
The Components of this screen are:
| Component Type | Palette Group | What you’ll name it | Purpose of Component |
| VerticalArrangement | Layout | VerticalArrangement1 | Contains the score |
| Label | User Interface | Label1 | – |
| Label | User Interface | Score | Shows the Score |
| Button | User Interface | Restart_Button | Closes the screen |
Set the properties as described below:
| Component | Action |
| VerticalArrangement1 | Set Height to 250 px… Width to Fill parent… Align Horizontal/Vertical to Center. |
| Label1 | Set Text to Score: … FontSize to 50… and FontBold to True. |
| Score | Set Text to [anything(It doesnt matter)],FontSize to 20 |
| Restart_button | Set FontBold to True, FontSize to 17,Text to “Restart”, TextAlignment to center, and Shape to rounded |
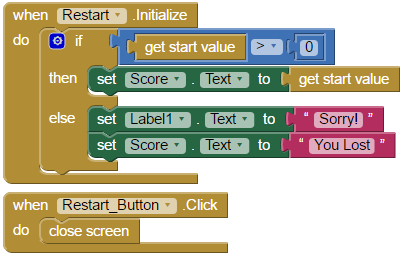
Set up the Blocks
You’re almost there. In this last part, You have to set up the blocks on the restart screen:
| Block Type | Drawer | Purpose |
| Restart.Initialize | Control | Executes commands when the screen Initializes |
| If…Else | Control | Executes a set of commands if condition is true and another set if it is not. |
| set Score.Text(x2) | Score | Sets the Score |
| Set Label1.Text | Label1 | Sets the text of Label1 |
| Restart_Button.Click | Restart_Button | Executes commands when the Restart Button is Clicked |
| get start value(x2) | Control | Gets the start value received through the open another screen with start value command |
| > | Math | compares if a value is greater than another value |
| 0 | Math | sets value to a number |
| “”(x2) | Text | Sets value to a string [text] |
| close screen | Control | closes the current screen |
When Put together, the blocks should look like this:
Final Program
Congratulations! You have successfully completed this app. You have made a neat little game using timers, conditionals, logic statements and much more.
Package the final version of the app by Build save .apk to computer / get Barcode When the barcode appears, use the barcode scanner on your phone to download and install the app.
Variations
Now that you have finished the first Catch app, you might want to build some variations. For example:
- Add difficulty settings which change the time and the speed of the ball
- Add sound effects and backgrounds.
- Advanced Challenge: Add a button that lets you share your score on twitter for no reason whatsoever
Leave a Reply